Wednesday, December 28, 2011

Android: INSTALL_FAILED_INSUFFICIENT_STORAGE error in ADB shell

I came across  INSTALL_FAILED_INSUFFICIENT_STORAGE error when I tried to batch install about 50 apps in sd card directory using adb shell after a full ROM update.
 
$ su
# cd /sdcard/batchInstall
# for x in *.apk; do pm install -r $x; done
 
Some of them installed, but many failed with the error INSTALL_FAILED_INSUFFICIENT_STORAGE. But I had plenty of space in both internal and sdcard. I noticed that all the failed apps had space in their name. I batch renamed them to remove space with '_' and tried again. It all worked this time. Hope this info will help someone with the same problem.

Tuesday, December 27, 2011

F8 key fail: Recover PC to factory state without a backup recovery disc

So I did something stupid. I installed Windows 8 Developer preview on Dell Inspiron Duo tablet PC. I mean, it was not the stupid thing (Windows 8 looks awesome on Duo), but installing it as 'Upgrade' replacing system Win7 OS and without backing up was the stupid thing. I could have done back up with Dell Datasafe Local backup, but I was lazy or daring or stupid or whatever; I didn't do that. Eventually something went wrong; Windows 8 took over the boot process and now I do not have a recovery disc and F8 key one rebooting doesn't work. The Windows recovery environment got really messed up since Windows 8 wrote files on my laptop's recovery partition.


Well, finally I got the system back to the Factory state and F8 is now working. Even better, I've Windows 8 Developer preview on a separate partition and separate recovery environment happily dual booting. I can now precisely control which OS to load and which recovery environment to boot. Some of the tool I found useful are Windows 7 bootable USB, RMPrepUSB, imagex, Minitools partition wizard, Windows Disk Management utility, Hirens Boot CD, 7-zip, Unstoppable copier and Visual BCD.

If you are also in such a situation, what you want to do is  to use imagex in recovery environment, take the Factory.wim in the recovery partition ([Recovery]:\dell\Image\Factory.wim ) and apply it to the C drive. You just need that one file in recovery partition to completely get back to your factory state.


If you need, you can open Factory.wim using 7-zip. You will need to show hidden files and system files to see those files in Windows. If you mount the drive in Windows 7/8, it is not possible to access most of the folders in Recovery partition. (Shows Dell logo and warning )

Learning about these things below helped me on the process
  1. Hard disk partition structure: MBR, partition table, boot sector
  2. Windows boot process and tools: boot manager, BCD, bcdedit.exe, bootrec.exe
  3. Windows Recovery Environment and images: WIM files, ImageX, ReAgen.xml, ReAgetC.exe

It's a too long story to write now, but I would post it sometime for documentation purpose for my future use. I'm planing to make latest OS image and backup to separate partitions and access it by say F5 or something on boot if needed.  I mean, I'll still have access to Factory image by F8, but you know, it'll take a few days to install all the updates over updates and your software etc after factory reset to get the system up and running, (if the system was bought several months back). Well, Dell Datasafe will do that if you upgrade the software. But then, where's the fun of learning?

Saturday, December 24, 2011

Dell Streak 5: Root Gingerbread Android 2.3.3 ROM


UPDATE 16th Jan 2012: This is not a Gingerbread ROM update tutorial. This is a tutorial to gain root access to already updated Dell Streak 5. Please follow my previous post if you want to update from Froyo to Gingerbread. 

Dell Streak 5: How to Install Official Gingerbread ROM (Android 2.3.3)
http://techienetizen.blogspot.com/2011/12/install-gingerbread-233-on-dell-streak.html

The usual disclaimer: Please read the disclaimer on the footer of this page before you attempt anything based on this post.
 
Requirements:


Process overview:
A) Enter fastboot mode and flash to the streakmod custom recovery
B) Reboot to the streakmod recovery and select ‘update from update.zip’ to select superuser apps. Now your DS should get rooted.
A) Enter fastboot mode and flash to the streakmod custom recovery

  • Connect  your DS to PC (You already installed drivers to it) and copy superuser.zip to the DS SD card and rename it as update.zip. (i.e. /sdcard/update.zip)
  • Stop USB connection and power down DS (DS is still physically connected to the PC through the cable)
  • Press and hold down the camera button and then press the power button. Release the button when you see a white screen
  • Select Fast boot mode on the top right on your mobile (DS display will show FASTBOOT_MODE)
  • Now it’s time to do some DOS commands from your PC to communicate with DS through the connected USB cable.
  • On your PC, navigate to the path where you unzipped the fastboot tools.(C:\Fastboot+ADB). You have already copied the streakmod recovery (C:\Fastboot+ADB\recovery.img) to this folder. (see requirements)
  • Press Shift key and from right click menu open a DOS command window on that folder
  • Type  'fastboot -i 0x413c flash recovery recovery.img' without the quotes and hit enter. You can see that your DS screen shows the response.(By the way, you can copy paste the commands to the DOS prompt. Right click on DOS command and paste.)
  • Type 'fastboot -i 0x413c reboot' without the quotes and hit enter.  
B) Reboot to the streakmod recovery and select ‘update from update.zip’ to select superuser apps.
  • On reboot, immediately go in recovery mode (hold both volume buttons while powering on). Don’t let it go to full system boot yet.
  • Select option 2: Update from update.pkg on sdcard. Now this would go to be the custom streakmod recovery. (See version number at lower bottom in yellow font. If not, you are not on StreakMod and you can't proceed) Select update.zip and proceed instructions to root
  • Now the rooting process will start and finish. You should see the messages. On rebooting, your DS will be rooted. 
  • Before rebooting your system again, you may need to do one more thing (optional). read on...
I found later that the official Dell ROM over wrote custom recovery. This post was helpful and you may want to follow that.

Custom Recovery – Prevent Overwriting on Dell Streak
http://www.rdtk.net/2011/06/14/custom-recovery-prevent-overwriting-on-dell-streak/

So before rebooting your system again, I did this one more thing; disabled install-recovery.sh script in /system/etc to prevent recovery overwriting.


You have many ways to do it. But this is the way I did it. 

  • Enable USB debugging. (settings>applications>development).  
  • Go to the DOS command again (C:\Fastboot+ADB\) and type these commands.

> adb devices
You should see some numbers. This is optional and just to check

> adb shell
Now you entered the remote shell; which is actually running in your DS

$ su
(Command to run as root. A pop up will come on DS screen asking for su permission and you should allow it. Now the prompt will change to #. If you see 'Permission denied", your rooting did not work and you cannot proceed )

# busybox mount -o rw,remount /system
(Mount the system with read-write permission.)

# cd /system/etc
(Change path to the location of the file. If you type ‘ls’ now, you can see a file named ‘install-recovery.sh’. The aim is to disable it by renaming)

# chmod 777 install-recovery.sh
(Change permission for renaming)

# mv install-recovery.sh install-recovery.sh.backup
(Rename the file. Now it’s done)

You may reboot the DS now. But if you want to batch install all the saved app collection back to new ROM, you can do it by a single command. Say, you have 50 apk files stored in /sdcard/backup/apps/


# cd /sdcard/backup/apps/
# for x in *.apk; do pm install -r $x; done


 This will install all the apps one by one. The app file names should not have any space in it.
 
Thanks to the smart guys at XDA forum for guides, how-tos, and for sharing all the required files.Check the forum link:
http://forum.xda-developers.com/showthread.php?t=840326 for more details and discussions.

Dell Streak 5: How to Install Official Gingerbread ROM (Android 2.3.3)


I just installed Official Dell Gingerbread (Android 2.3.3) ROM on my Dell Streak 5 (DS) and it works quite well so far. Now the front facing camera works for Skype. Fring used to do this in Froyo, but now more options for Face chat. The launcher is same Dell Stage, so do not expect a very different UI when you boot up. I heard one guy yelling at Dell in one forum.. "Dell cheated.. It is not different from Froyo". Honeycomb will bring the ultimate change, but don't know whether DS development will go that far. Considering that Dell Streak is the only Pentagon approved Android phone for Defense use and Dell provides support to them, we may see some more updates in near future.
__________________________
UPDATE 29th Dec 2011: Please read the disclaimer at the footer of this page. You should know what you are doing. Do your home work, use Google and learn about it. Visit XDA forum tutorials and discussions. The post here is my experience installing into only one Dell Streak 5. Your Dell Streak ROM version could be different. I have no idea what will happen in all those different ROMs and situations. FYI, I was upgrading from US unlocked Froyo 2.2.2, (360) to 2.3.3 (407). Back up your important files and keep a spare phone ready in any unfortunate event. Ok, my disclaimer ends now.

UPDATE 30th Dec 2011: Gingerbread 2.3.3 ROM is significantly snappy and smooth compared to Froyo. I'm very happy with it so far. Only problem I find till now is that USSD code is not working. I can't check the balance by the code. But I use the carrier app to check the balance etc. So it's not an issue for me. (Check T-mobile app in Android market, if you are a T-mobile US customer and if you are not aware about it).

Remember that I don't have any control over the external download links/files. I noticed that the Fastboot+ADB zip file contents have been reorganized by the owner of the file to add new option for different OS platforms. So change the folder accordingly to see fastboot.exe. From one of the fellow netizen's comment, it appears that there could be easier methods at XDA form. Google it. 

UPDATE 12th Feb 2012: Added the Dell driver link and edited to reflect the change in Fastboot+ADB.zip file reorganization. New archive contain files for Linux and OSX also.


UPDATE 8th May 2012: How to fix the USSD code problem? Well, I got it fixed following the instructions at XDA forum. Thanks to hunderteins and TheManii. 
http://forum.xda-developers.com/showthread.php?s=11f3127f9489d2629df1a87349664f5e&t=1558089

UPDATE 12th May 2012: I've posted detailed instructions to fix USSD code problem.
http://techienetizen.blogspot.com/2012/05/dell-streak-5-ussd-code-problem-fix-for.html
__________________________

Here's the process I followed.

Requirements:
  1. A PC and DS USB cable: You should have your Dell Streak drivers installed on your PC. It's available from Dell support site. http://ftp1.us.dell.com/Handheld/R288920.exe
  2. You need fastboot tools
    http://mirror2.streakdroid.com/manii/Tools/Fastboot+ADB.zip

    Unzip to a folder; say C:\Fastboot+ADB
  1. Download official Gingerbread release from Dell. This is a Korean carrier, Olleh, version. But English language is available.
    http://mobileupdate.dell.com/PackageProductionLocations/Streak_407_20707_14.pkg

    Rename the downloaded ROM to update.pkg and transfer it to your phone SD card
  1. Download corresponding recovery image.
    http://mirror2.streakdroid.com/manii/407/recovery.img

    Copy ‘recovery.img’  to fastboot tools directory (i.e. C:\Fastboot+ADB\Win32)


First step is to flash to correct recovery

  • Connect your DS to PC (You already installed drivers to it) and copy Streak_407_20707_14.pkg to the DS SD card and rename it as update.pkg. (i.e. /sdcard/update.pkg)
  • Stop USB connection and power down DS (DS is still physically connected to the PC through the cable)
  • Press and hold down the camera button and then press the power button. Release the button when you see a white screen
  • Select Fast boot mode on the top right on your mobile (DS display will show FASTBOOT_MODE)
  • Now it’s time to do some DOS commands from your PC to communicate with DS through the connected USB cable.
  • On your PC, navigate to the path where you unzipped the fastboot tools.(C:\Fastboot+ADB\Win32). You have already copied the recovery (C:\Fastboot+ADB\Win32\recovery.img) to this folder. (see requirements)
  • Press Shift key and from right click menu on anywhere on the folder (on empty space without selecting any files or folders) open a DOS command window on that folder. Or Start menu > Programs > Accessories > Command Prompt. Now type 'cd C:\Fastboot+ADB\Win32'. Type dir and you should see all the files and folders in C:\Fastboot+ADB\Win32. Type 'fastboot' and you should see a list of command options.
  • type 'fastboot -i 0x413c flash recovery recovery.img' without the quotes and hit enter. You can see that your DS screen shows the response. (Make sure that the DS white screen says 'download done' or something like that.)
  • type 'fastboot -i 0x413c reboot' without the quotes and hit enter. This will reboot your phone. Now on rebooting, immediately enter to recovery mod (hold both volume buttons while powering on).
The update process:
  • Now you are booted to new recovery. Select option 2; software upgrade via Update.pkg on SD card. You will see a warning saying that all your data will be erased. (You already know that, don't you?). Did you see a serial number ending in 40714? (If you used 407 recovery) This step is to make sure that you have flashed 407 recovery properly. If not you may need to press the volume up button to power off and flash again
  • Press the shutter button (camera) to continue and you should see a progress bar. Leave it to do the update. It'll reboot once its done. You should see one more update process with progress bar showing a 'Dec 1' date.
  • Once these are done you will see Olleh logo on boot. Gingerbread now. Play around (if you don't know to read Korean) and change the language to English. (When you touch the Android, the button below right is for language I guess)


Thanks a bunch to the geeks at XDA forum for their fantastic job!


Now how to root this ROM? Check my next post.
______________________________________

Reference:
New ROM :: 407 OFFICIAL GB ROM IS OUT


Dell Streak 5 XDA Wiki

Other links
Dell releases official Gingerbread ROM for Streak 5
http://www.streaksmart.com/2011/12/dell-releases-official-gingerbread-rom-for-dell-streak-5.html


Some background information for beginners
ROM:
A ROM is the actual Android operating system installed on your Dell Streak. Check whether your OS is update by checking the latest release (See reference). Your can see the version, build details etc from Settings > About Phone. The factory installed ROM of my DS when I bought it was version 345, build 15380, Android 2.2.2 Unlocked US version. So the corresponding ROM is Streak_345_15380_00.pkg
You can see all the releases here:


Fastboot:

Fastboot is a protocol used to update the flash file system in Android devices from a host over USB connection (to your PC).You’ll use the DS 40 pin USB connector/charger to do fastmode commands. It allows flashing of partition images. This is one way to load/delete/modify your recovery image. To do any upgrading you need to use fastboot.

Sunday, November 27, 2011

Kindle Fire 7" vs Dell Streak 5" vs iPod Touch 3.5" (2g) vs Dell XPS 15z: HD video play

This is a HD video play comparison of Kindle Fire 7" (tablet) with some other devices of different screen sizes. All the devices are set on their max brightness and screens are the same as new directly received from the respective manufacturers.


Devices in the video are...
Tablet: Kindle Fire 7" (1024 x 600)
Tablet phone: Dell Streak 5" (800 x 480)
Cellphone (size): iPod Touch 3.5" (480 x 320)
Laptop: Dell XPS 15z 15.6" (1080 x 1980) 1080p

Playing a YouTube Video file (1280 x 720) downloaded as mp4.

Thanks to fellow Youtuber Cafeberdar for uploading the remix video.
http://www.youtube.com/watch?v=P2AyN4rEiOM

The Kindle Fire is streaming video from my Desktop PC hard disk over WiFi.(through Gmote software) Dell streak and XPS are playing the file stored locally. iPod is streaming directly from YouTube over WiFi.

Observe the details and color differences.


Technical details of the devices:
Kindle Fire: http://www.amazon.com/Kindle-Fire-Amazon-Tablet/dp/B0051VVOB2
Dell Streak 5: http://www.gsmarena.com/dell_streak-3353.php
iPod Touch: http://support.apple.com/kb/sp496
Dell XPS 15z: http://www.dell.com/us/p/xps-15z/pd

Saturday, November 26, 2011

Kindle Fire: WiFi streaming videos from Desktop hard disc

If you have movie files in your desktop PC, you can stream and play it on your Kindle Fire for free with a few simple steps. This is especially convenient if your Desktop PC is on your basement and if you want to watch something when you are laying down lazy on your comfy living room couch. You don't need to copy them to Kindle Fire, the play starts instantly.

The software Gmote will let you do this for free.
http://www.gmote.org

1) Install the server on your PC and add the movie files folder to the Gmote configuration options.
2) Install the apk on your Kindle Fire
3) Scan on your Kindle Fire for the PC server, connect, browse the file and play (by selecting phone).

Streaming is quite smooth.

UPDATE: 27th Nov 2011
Check this video in which Kidle Fire streams an HD video from my PC Desktop harddisk. Kindle Fire is the screen at bottom left. http://techienetizen.blogspot.com/2011/11/kindle-fire-7-vs-dell-streak-5-vs-ipod.html


But don't expect a lot from Gmote software. It's currently in beta version. There's a lot of improvment needed to make it userfriendly. I hope they'll actively develop this one.

The movie files should be in a Kindle Fire supported format. (mp4 format works well). Supported Kindle Fire video and audio formats
    * Video: H.263 (.3gp, .mp4), H264 AVC (.3gp, .mp4), MPEG 4 SP/ASP (.3gp), VP8 (.webm)
    * Audio supported within Music: AAC LC/LTP, HE-AACv1 (AAC+), HE-AACv2 (enhanced AAC+), AMR-NB (.3gp), AMR-WB (.3gp), MP3, MIDI, Ogg Vorbis (.ogg), PCM/WAVE (.wav)

Ref: http://www.amazon.com/gp/help/customer/display.html?nodeId=200729530

You can use Handbreak to convert your DVD collection to MP4 formats
http://handbrake.fr/details.php

**Some thoughts:
Looks like someone has figured out to stream this way over a 3G connection. Don't you think it would be awesome if you can stream your HD camcorder videos (or movie collection) stored in your home Desktop  on a family vacation at your grandma's home?

Tuesday, November 22, 2011

Kindle Fire: Copy files from Android Phone through WiFi

Here's one way to share files with your android phone over wifi. You can copy files from/to your phone's SD card to/from your Kindle Fire using your WiFi; no cables needed.

Requireents:
A) Both your Kindle Fire and Android Phones are connected to the same WiFi network (Say your home WIFI)
B) ASTRO File Manager in your Kindle Fire and SSHDroid app in your phone

1. Install SSHDroid app in your phone and open it. You'll see IP address of your phone (192.168.??.??) and port (2222?)
1. Install ASTRO File Manager app on your Kindle Fire
2. Open the ASTRO File Manager app in your Kindle Fire and add network by giving the Android phone IP address (and port)
3. You can now use ASTRO File Manager to browse Android Phone contents with your Kindle Fire and copy/paste/delete files

You can also do the other way; connect your Android Phone to access your Kindle Fire.

Sunday, November 20, 2011

Kindle Fire: WiFi File transfer with Windows PC desktop or laptop

You have a Kindle fire and you have a big collection of music/ebooks on your desktop or laptop connected to your home network over WiFi / LAN. But Kindle fire has only 5GB storage space and there is no external microSD card slot for expanding the storage. Here are some options to transfer files between the Kindle Fire and Desktop PC. There are many other cloud sharing options for syncing files between your device and PC, but the methods below is for communicating directly between Kindle Fire and a PC over a WiFi to which both are connected.

UPDATE: 26th Nov 2011
Method 1(ES File Explorer) and Method 4 (SSHDroid+WinSCP) are the options I like so far;
~Method 1 if you are on Kindle Fire and want to access windows
~Method 4 if you are on Windows and access Kindle Fire.

WinSCP also gives options to sync Kindle Fire sdcard directory to my laptop so that I can synchronize files to and fro easily. On my WiFi I get speeds of 2 MB/second with WinSCP, which is pretty good.  I recommend Method 4 option if you have to transfer files regularly.


Method 1: Browse PC files from your Kindle fire using a free app ES File explorer
Requirements:
A) You should share your LAN connected Desktop folders of your ebook/music files in Windows 7/Vista/XP
(Search Google or refer http://techienetizen.blogspot.com/2011/07/share-windows-7-host-files-to-linux.html)
B) ES File exporer app from Amazon Appstore (Free)

Step1) Connect your Kindle Fire to WiFi.
Step2) Go ahead to the Amazon Appstore, download and install ES File explorer (Free app)
Step3) Open the ES File explorer app and from the top left corner drop down menu select LAN
Step4) Now from the bottom menu, select "New" > "Scan". (make sure your PC is booted and on) If the app crashes, do it again couple of times. The Desktop PC will be displayed in the background with it's IP address (192.168.?.?). You may stop it from the bottom menu if it keep scanning for long time.
Step5) Open the LAN device icon and it'll fail and ask for password the first time you login. Login with your Windows Desktop PC password. You may save the password. Now you will see the shared folders/printers etc from your desktop. You can easily browse, copy, paste files from your desktop to your Kindle fire now over WiFi. No USB cable needed.

Method 2: Browse Kindle fire files from your PC using another free app WiFi File Explorer
Requirements:
A) A browser on your PC: IE/Firefox etc
B) WiFi File Explorer app from Amazon Appstore (Free)

Step1) Connect your Kindle Fire to WiFi.
Step2) Go ahead to the Amazon Appstore, download and install WiFi File Explorer app (Free app)
Step3) Open the WiFi File Explorer app. It'll show the connected WiFi and file explorer web URL
Step4) Now on the PC, open the browser and type the URL. You'll see the Kindle Files in the browser.
Step5) You may want to password protect the sharing.  Go to the menu at the bottom, check the "Require Password" and enter password at "Password" section. Now if you refresh the PC browser, it'll show a password field. Login with the password and you can do a lot of file operations.

I tried two more options, but a little more complicated. This uses a SSH connection by using an app SSHDroid

Method 3) Browse Kindle Fire files over Wi-Fi through Windows Explorer using Swish program
 
Requirements:
A) Get the free SSHDroid App from Android Market and install on your Kindle
B) Download Swish software from http://www.swish-sftp.org/ and install on your PC

Step1) Open the SSHDroid and you’ll see the IP Address (192.168.?.?) and port (2222); User name is root.
Step2)  Use the above settings to configure Windows PC and connect to the Kindle Fire
Follow this instructions
http://www.addictivetips.com/windows-tips/map-network-location-over-ssh-sftp-in-windows-explorer/

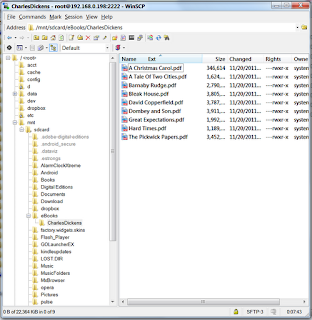
Method 4) Browse Kindle Fire files over Wi-Fi through WinSCP program

Requirements:
A) SSHDroid App for the Kindle Fire
B) WinSCP free program http://winscp.net/eng/download.php
http://winscp.net/download/winscp435setup.exe  For your PC

Step1) Same as Method 3
You get the IP address (192.168.?.?) and Port number (usually 2222) of Kindle fire from SSHdroid. The username is 'root' and password is 'admin'

Step2)
a) In WinSCP click new, add IP address in the 'Host name, change port number from 22 to 2222. Use 'root as the user name and 'admin' as password (Select SFTP from dropdown) and click save. You can see 'Save session as' window. Save as any name (say "kindleFire").
b) Now when the first time you login, you'll be asked for confirmation. Just go ahead and proceed. You'll be able to login to the Kindle fire.
c) Depending on the view, you may see left side half of window your PC and right side your Kindle Fire directories. You can drop down the top directory selection to go to /mnt/sdcard and you can drag and drop any files here from your PC.

Once you are done with the file transfer, you can close SSHdroid in Kindle Fire.

Once you set up this, next time you want to transfer files, you only need to do two things:
1) open SSHdroid in your kindle fire
2) open WinSCP and click the stored session ("kindleFire") and you should be instantly connected to Kindle Fire.


Follow this instructions for details
http://winscp.net/eng/docs/guide_connect
Happy Kindling


Using the USB cable is the fastest copying option. Using Drop box cloud sharing is also convenient. (only 2GB free). I'm not sure at this moment which one I will eventually use for carefree convenient daily use.

Friday, November 18, 2011

Instal Android Market apps on Kindle Fire

 There may be several ways to install Android Market apps, but here's one way I did it.
1) In my Android Phone (Running Android 2.2 Froyo) I backed up all the apps to my SD card
2) Transferred the apps to Dropbox online cloud
3) Downloaded to my Kindle Fire and installed apk files from there...


Tools I used:
ES File Explorer (Available free from Amazon Appstore), ASTRO File manager, Dropbox

Good news, many Android Market apps work in Kindle Fire!!


Although I have Google Music app working flawlessly on my phone, I can't get the same app version online streaming on my Kindle Fire. All the apps that require Google account doesn't seems to fully work. I can use the Google services like Google docs, calendar etc from the Amazon Silk browser.

LauncherPro does not work. But Go Launcher EX is working perfect replacing the default Kindle Launcher. (The version on Amazon App store is old. Get the latest version from Android Market) Now its like a cool tablet and will generate a huge market for $200 price range tablets. I'm pretty impressed so far. More of my experience coming soon...

A better way to mass transfer apk files is through connecting to your PC/laptop. Kindle will connect through a Micro B USB cable to your PC. You might already have one if you use a Samsung/Blackberry phone. My Logitech mouse charger is Micro B USB cable and I could connect Kindle Fire to laptop via that cable. So copy the apk files to the Kindle Fire storage and start installing one by one.


Cheers
Happy Kindling..

Saturday, November 12, 2011

Kindle Fire vs Nook Tablet:: Insufficient storage killed Kindle option for me

.SpecKindle FireNook Tablet
.Processor1GHz TI OMAP4 (dual-core) processor1GHz TI OMAP4 (dual-core) processor
.Screen7" multi-touch display with IPS (in-plane switching) technology and anti-reflective treatment, 1024 x 600 pixel resolution at 169 ppi, 16 million colors.7" VividView™ Color Touchscreen
16 million+ colors, IPS2 display
High resolution display—1024 X 600, 169 pixels per inch (PPI)
Fully laminated with no air gaps for remarkable clarity and reduced reflection & glare-read indoors or outside
.Memory (RAM)512MB of RAM1GB RAM
.Dimensions, weight7.5" x 4.7" x 0.45" (190 mm x 120 mm x 11.4 mm). 14.6 ounces (413 grams).Height: 8.1 inches
Width: 5.0 inches
Depth: 0.48 inches
Weight: 14.1 ounces1
.Memory (Storage)8GB internal (approximately 6GB available for user content). That's enough for 80 apps, plus 10 movies or 800 songs or 6,000 books.16 GB (up to 10,000 books) built-in memory
.Memory (Storage- External)No. Unlimited Amazon cloud storage for Amazon contents.Add up to 32GB with microSD™7 memory card
.Battery and powerUp to 8 hours of continuous reading or 7.5 hours of video playback, with wireless off. Battery life will vary based on wireless usage, such as web browsing and downloading content. Fully charges in approximately 4 hours via included U.S. power adapter. Also supports charging from your computer via USB.Up to 11.5 hours of reading or 9 hours of video without recharging5
Installed rechargeable battery
Charge from a wall outlet using the in-box Power Adapter and USB Cable (charging time: approximately 3 hours from wall outlet)
.OSCustomized OS based on Android 2.3.4 (Gingerbread)Customized OS based on Android 2.3 (Gingerbread)
.File Type supportKindle (AZW), TXT, PDF, unprotected MOBI, PRC natively, Audible (Audible Enhanced (AA, AAX)), DOC, DOCX, JPEG, GIF, PNG, BMP, non-DRM AAC, MP3, MIDI, OGG, WAV, MP4, VP8.Load EPUB (including Adobe DRM or DRM free) or PDF file types from your computer or microSD card
Other documents: XLS, DOC, PPT, TXT, DOCM, XLSM, PPTM, PPSX, PPSM, DOCX, XLX, PPTX
Watch videos in MP4, or Adobe Flash Player format, 3GP, 3G2 MKV, WEBM (Video Codecs: H.264, MPEG-4, H.263, VP8)
Load photos and create personal wallpaper: JPG, GIF, PNG, BMP
Play audio on built-in mono speaker: MP3, MP4, AAC, AMR, WAV, OGG (Audio Codecs MP3, AAC, AMR, LPCM, OGG Vorbis)
.WiFiWireless connectivity via Wi-Fi® (802.11b/g/n)Wireless connectivity via Wi-Fi® (802.11b/g/n)
.MicrophoneNoYes
.CameraNoNo
.Ports/Connections3.5 mm stereo audio jack, top-mounted stereo speakers.Universal 3.5 mm stereo headphone jack
Charging port
Expandable microSD8 slot
.OtherUltra-fast web browsing - Amazon SilkNA


Both of them won't have access to Android Market. Although you can always install from apk files, there could be a lot of issues regarding app compatibility because of the high customization of the Android OS in both of them.. read as "lot of FC" even if you could install the app. I hope someone will port original Android 2.3 OS into these devises so that we can use the Android apps without issues

I canceled the Kindle Fire pre-order just now after carefully looking at the specs. My main use will be to load my e-library of thousands of e-books, documents and scientific journal articles from my University in PDF format. Hence storage will be crucial for me. "Cloud" is good but what do I do when I don't have WiFi access? I'm looking forward to Nook tablet reviews. I'll get a 16gigs microSD if I buy Nook Tablet and with 32Gigs, I've sufficient space. With an additional 16GB card, I can always keep the extra stuffs in my wallet. Now double the RAM in Nook is good to load large e-book files with lot of images into the memory.


Let the tablet war begin!

UPDATE: 17th Nov; Amzon did not cancel my Kindle Fire order and it was delivered. I'm currently test driving it.
_____________________________________________________________

Kindle Fire - Full Color 7" Multi-Touch Display with Wi-Fi - More than a Tablet
http://www.amazon.com/gp/product/B0051VVOB2/ref=ox_ya_os_product

BARNES & NOBLE | NOOK Tablet™
http://www.barnesandnoble.com/p/nook-tablet-barnes-noble/1104687969

A nice comparison is here:
Nook Tablet vs. Kindle Fire: how the specs compare – New Tech Gadgets & Electronic Devices | Geek.com
http://www.geek.com/articles/gadgets/nook-tablet-vs-kindle-fire-how-the-specs-compare-2011117/